Equipment Checkout
Bose L1 Pro 16 Basic Setup
The Bose L1 Pro system is easy to set up and easy to use. This guide will give you pointers on how to put the device together and get it running.
If you have any questions that are not covered in this guide, you may refer to this manual or reach out to us at 256.782.5759 during our office hours, 8 AM to 4:30 PM.
After you have removed the base from the case, there are two zippers on the left and right sides of the case that must be undone to access the rear compartment. They can be easy to miss if you are not looking for them. 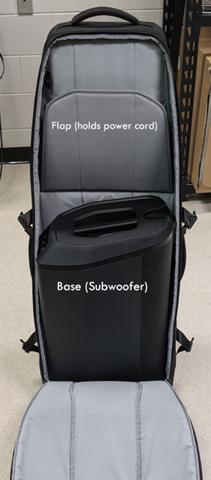 |
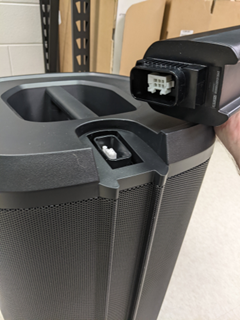
The equipment is kept in a specially designed case that keeps everything in a neat package. The first thing you should see after opening the case is the base. On the back of this base are the mic inputs, volume controls, and power button. This base also provides the bass, or the lower frequencies of sound. Above the base there is a flap held by Velcro. Behind this flap you should find the power cord, but if not, you will likely find it in the rear compartment. |
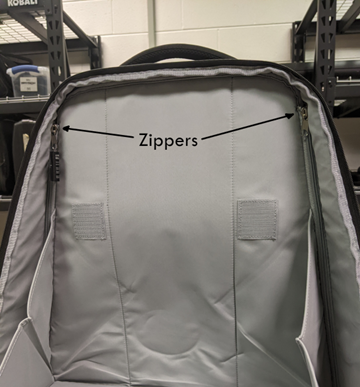 |
After you have removed the base from the case, there are two zippers on the left and right sides of the case that must be undone to access the rear compartment. They can be easy to miss if you are not looking for them. |
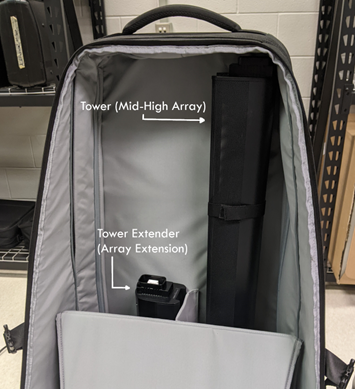 |
In the rear compartment you will find both the tower extender and the tower itself. The tower provides the mid-range and treble of the sound. Without the tower, music and speech may sound muffled. |
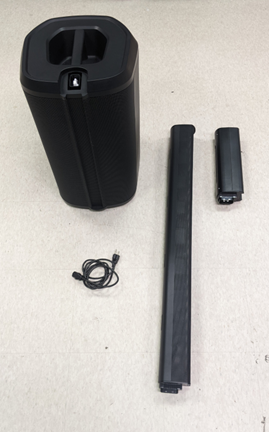 |
Once everything is pulled out of the case, you should have the following:
The base, the tower, and the extender stack on top of each other, making for easy assembly and disassembly. |
 |
Step 1: Inserting the Extender (Optional) The Bose L1 Pro works fine without the extender between the base and the tower, but if you want to lift the tower to be closer to ear-level, then you may want to put the extender on before putting the tower on. If you are placing the device on a lifted stage, the extender will likely be unnecessary. If you are placing the device on the floor at audience-level, the extender may be necessary to allow for better sound coverage. Either way, the extender is optional. |
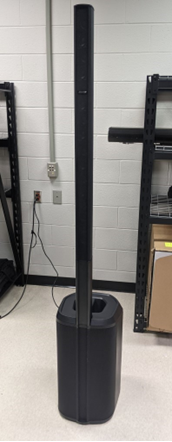 |
Step 2: Inserting the Tower Whether or not you inserted the extender, the tower inserts into the base or the extender in the same way. On the left, you see the finished assembly with the extension, and to the right, without the extension. Without the extension, the device stands 5 feet 6 inches (~168 cm). With the extension, the device stands at 6 feet 7 inches (~201 cm). While the Bose system will be able to produce sound without the tower attached, it will sound muffled without the treble and mid-range provided by the tower. |
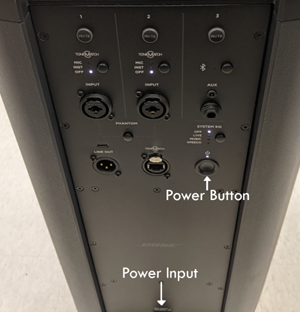 |
Step 3: Plug in the Power Cord and Turn it On At the back of the base, there is a spot to plug in the power cord. Once you have everything plugged in, simply press the power button at the bottom right of the controls. The light above the power button should turn white if everything is working correctly so far. |
|
⚠ Warning: A little goes a long way! When setting up the device, you may be tempted to turn up the volume knobs before testing microphones, instruments, Bluetooth enabled devices, etc. When first testing your equipment with the PA system, have the volume knobs set to low and turn the volume up as necessary as you perform the sound test. Testing at high volume without testing the system at lower volumes first may result in audio that is exceedingly loud and unpleasant! This system is quite powerful, so a little truly does go a long way, especially when it comes to music.
|
|
 |
How to Connect Bluetooth The Bose L1 Pro comes with Bluetooth technology that can allow you to connect your phone or other device wirelessly to the system.
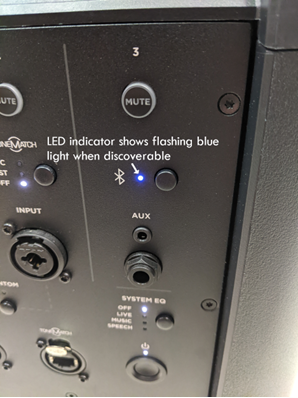
Step 1: Turn on the Bluetooth functionality on your device This should be able to be found on your device by searching for “Bluetooth” in your device’s settings. Step 2: Press and hold the Bluetooth button for two seconds You can find the Bluetooth button on the right side of the controls, right below Channel 3's Mute button. The light by the Bluetooth button will flash blue if the PA system is discoverable. If the indicator is solid white before you connect to it, then the system is already connected to another device. This other device will need to be disconnected before you can use the system. Holding the Bluetooth button for two seconds should unpair the system with the other device and make it discoverable again. |
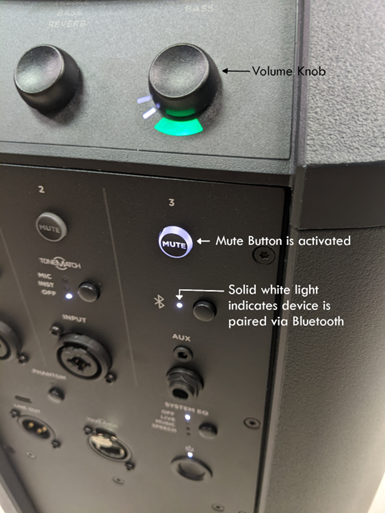 |
Step 3: Select "Bose L1 Pro" from your Bluetooth device list on your device and connect to it If your device is properly connected, the light by the Bluetooth button will turn solid white. Step 4: Adjust Channel 3 volume as necessary By default, the volume on Channel 3 will be set to zero, so if your device is connected but no sound is going through, slowly turn the Channel 3 knob. You might also want to check to be sure that the Channel 3 mute button isn't activated. Step 5: Disconnect when done! When you are done with the Bluetooth functionality, disconnect your device from the speaker through your device. |
Basic Setup
Shure wireless microphone systems are easy to set up and easy to use. This guide will give you pointers on how to set up and use this system.
Step 1: Plug in the receiver to a power source
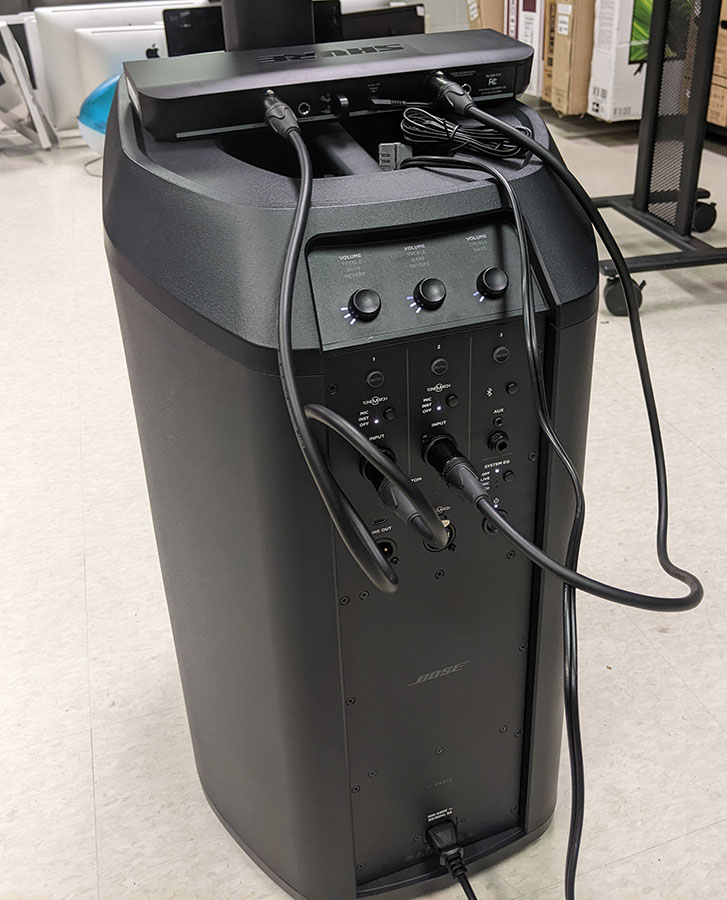
Included in the bag should be a power cable. Plug this cable into a power source and plug the other end into the DC power jack, located on the back end of the receiver.
Step 2: Plug in the receiver into speaker system
Plug the two short mic cables into the back of the receiver and run them into the mic cable inputs at the back of the speaker.
Step 3: Turn on the receiver
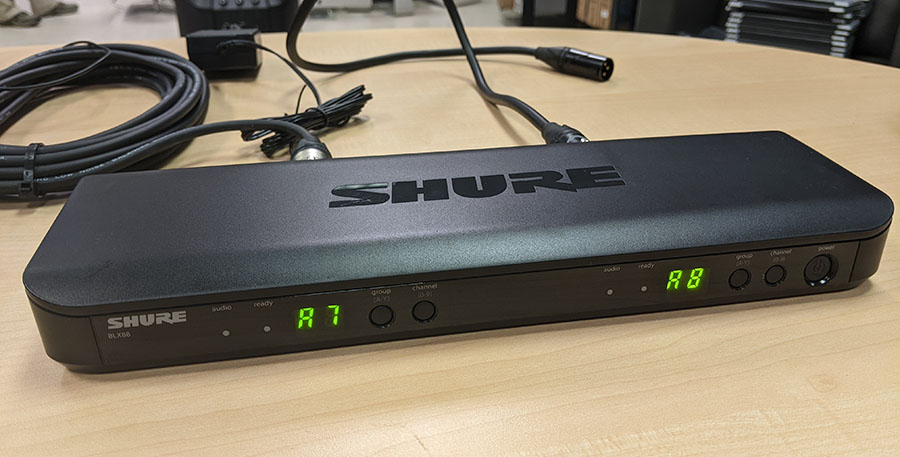
Press the power button on the front of the receiver. The display at the front should turn on.
Step 4: Ensure that the microphones are on and set to the same group and channel as the receiver
Looking at the first image in this document, you can see that the display reads "A7" and "A8", so both outputs are set to Group A and the first one is in Channel 7 and the other is Channel 8. If both the microphone and the receiver is on, but sound from the microphone is not running to the speaker, you may need to change the channel and the group on the microphones to match one of the outputs on the receiver.
 |
For a wireless handheld mic like this one, unscrew the cover to expose the Group and Channel buttons. Push (but do not push and hold) the Group button until the letter on the display matches a Group on the receiver and then do the same for the Channel. |
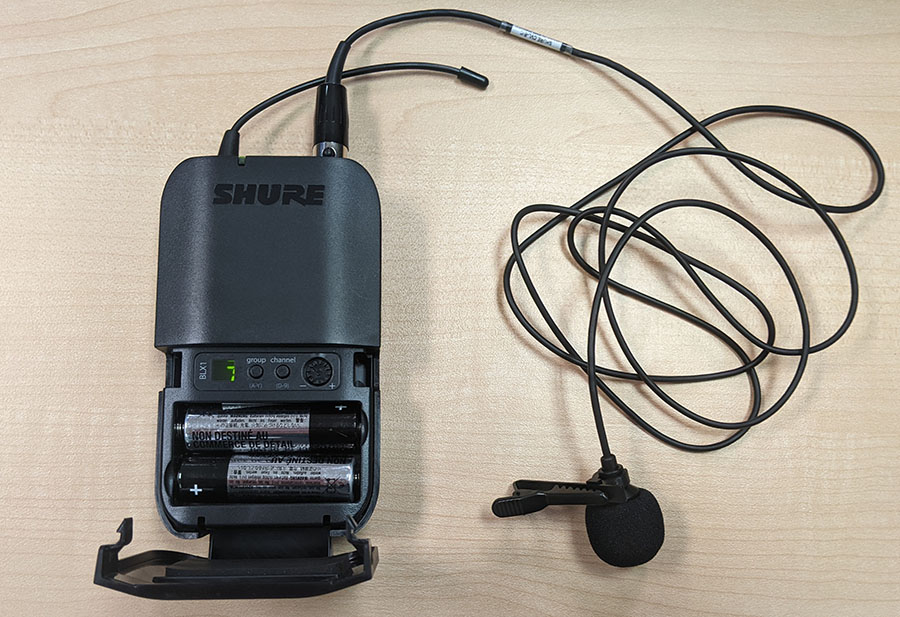 |
For a bodypack connected to either a lapel mic or an over ear mic, open the cover on the lower half of the pack to expose the Group and Channel buttons. Push the Group button until the letter on the display matches a Group on the receiver and then do the same for the Channel. |
Step 5: Turn off microphones when done!
Wireless microphones are powered by batteries, so to save energy be sure to turn off microphones when they are not in use.
⚠ Warning: Feedback
Wireless microphones give you the ability to move freely without the need to drag a cord around. However, this freedom also leads to a higher danger of a microphone getting too close to a speaker. When a microphone is too close to a loudspeaker, the loudspeaker's sound can be picked up by the mic resulting in a feedback loop that can cause a loud ringing noise. Be mindful of where you place the loudspeaker, and when using the microphone avoid moving too close to the speaker.
Projectors
Projectors are easy to set up and easy to use. However, there are occasional hiccups that can happen that can complicate the set up. This guide will give you pointers on how to set up and operate a projector.
Step 1: Connecting the Projector
In the projector bag there should be two cables, a power cable and an HDMI cable. Simply plug the power cable into a power source and connect the HDMI cable to your computer.
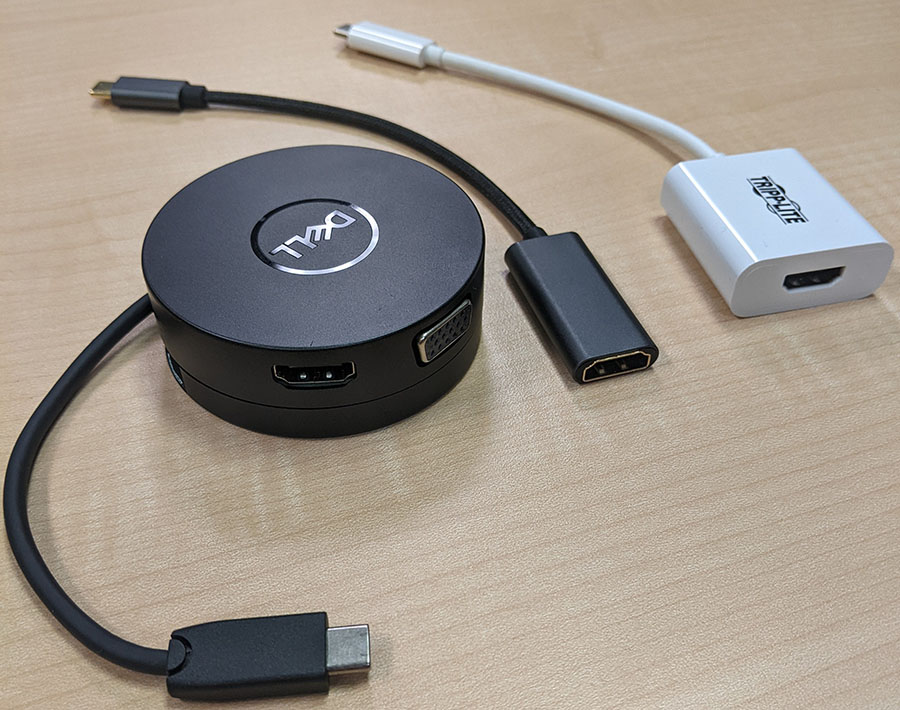
However, your computer may not have an HDMI port. Lately, many laptops have been made with USB-C ports instead of HDMI ports. If this is the case, you may use a HDMI to USB-C Adapter, like the ones pictured below. Simply plug the HDMI cord into the adapter and then plug the adapter into the computer.
Step 2: Turn on the projector
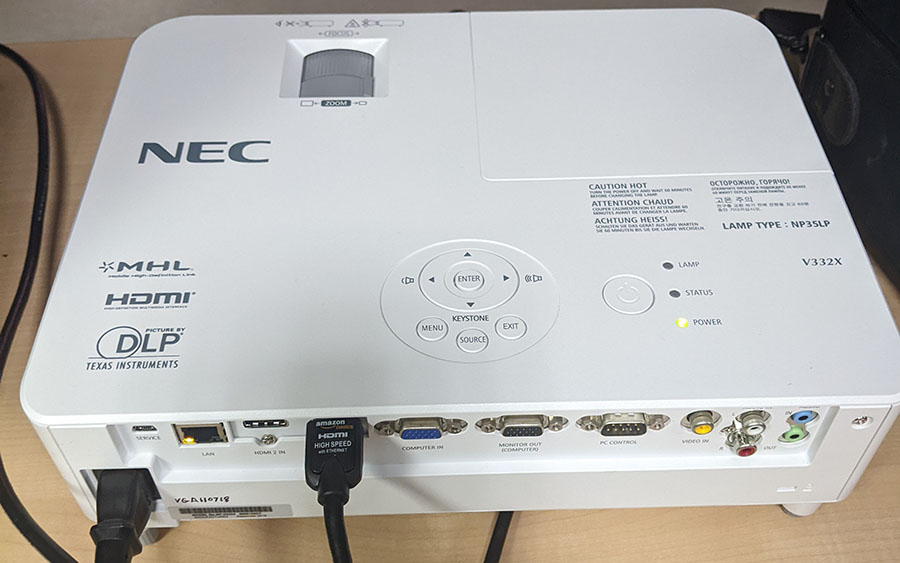
Find and press the power button. This location of the power button varies depending on the projector, but is typically on the top of the projector.
Step 3: Ready!
After a short warmup, the projector should be shooting an image from your computer.
Troubleshooting: Blue Screen
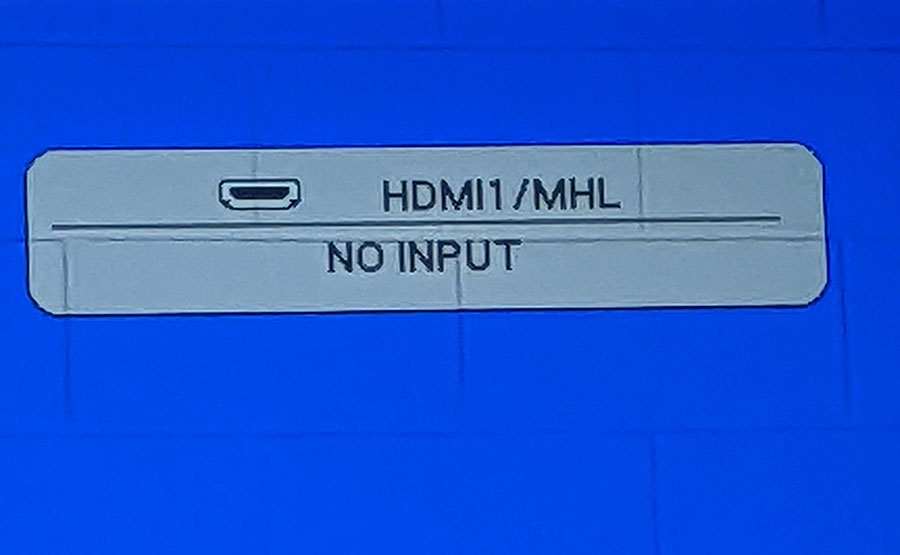 |
If the projector instead shows a blue screen, check to see if the projector is set to the right channel. Some projectors have multiple HDMI inputs, so there is a chance that the projector is set to another HDMI channel. Simply press the "Source" or "Input" button until the right input is displayed. This projected image shows that the projector is set to display the signal from HDMI 1. Check the back of the projector to see where your HDMI cord is plugged into. |
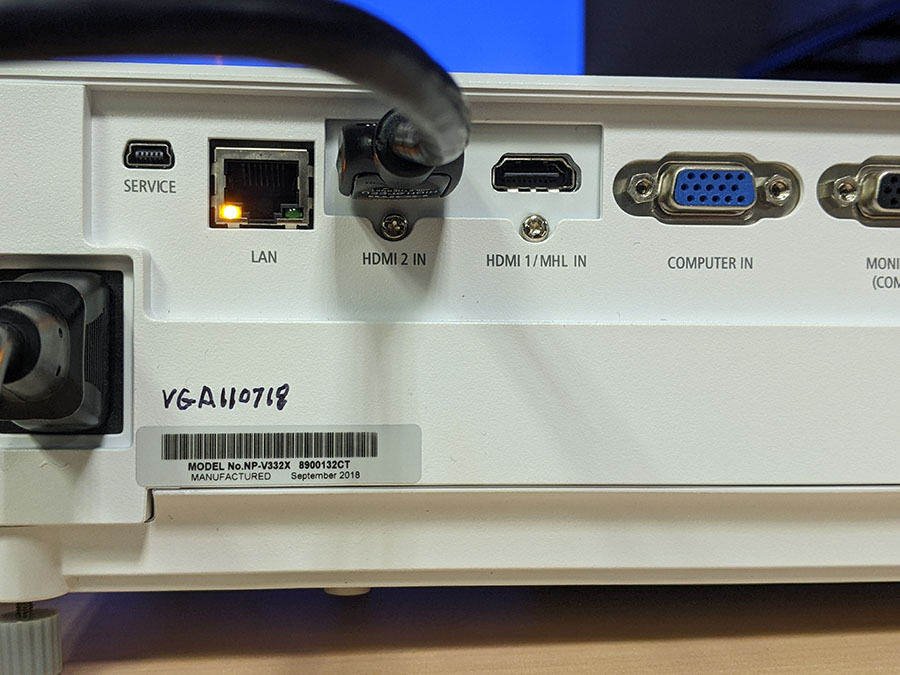 |
Here are the two HDMI inputs at the back of the projector. The cord is plugged into the HDMI 2 input, meaning that if the projector is set on HDMI 1, it will not display the image. You can change which input is projected by pressing the "Source" or "Input" button. |
There could be other causes as well, such as a faulty HDMI cord, an HDMI cord that is unidirectional (the cables Jax State AV provide for projectors should not be unidirectional), or faulty ports on either the source device or the projector. If changing the input doesn't work, try plugging the HDMI cable into another port on the projector, turning the cable around where the ends plugged into the projector and the source device are swapped, or plugging the projector into a different device. This may solve your problem or at least give you a better idea of what might be going on with the projector.
Troubleshooting: Displaying an Image, but not what is on your other screen
You may find that the image on the projector displays a blank desktop instead of the image on your other display. This is because the projector is being treated as an Extended display. When your computer has multiple displays connected and is set to Extend the display, you can drag and drop application windows onto the other display by dragging them to the edge (usually the right edge) of your main display.
 |
If you want to move *The Thing You Want to Show People* to the projected image, click and drag the window to the right of your display. The window should then appear on the projected image. |
If you want the projector's image to be the same as the image from your other display, you need to go to Windows Settings. You will find the Display section under System settings. Click on the dropdown menu under "Multiple displays" and select the option to Duplicate the display.
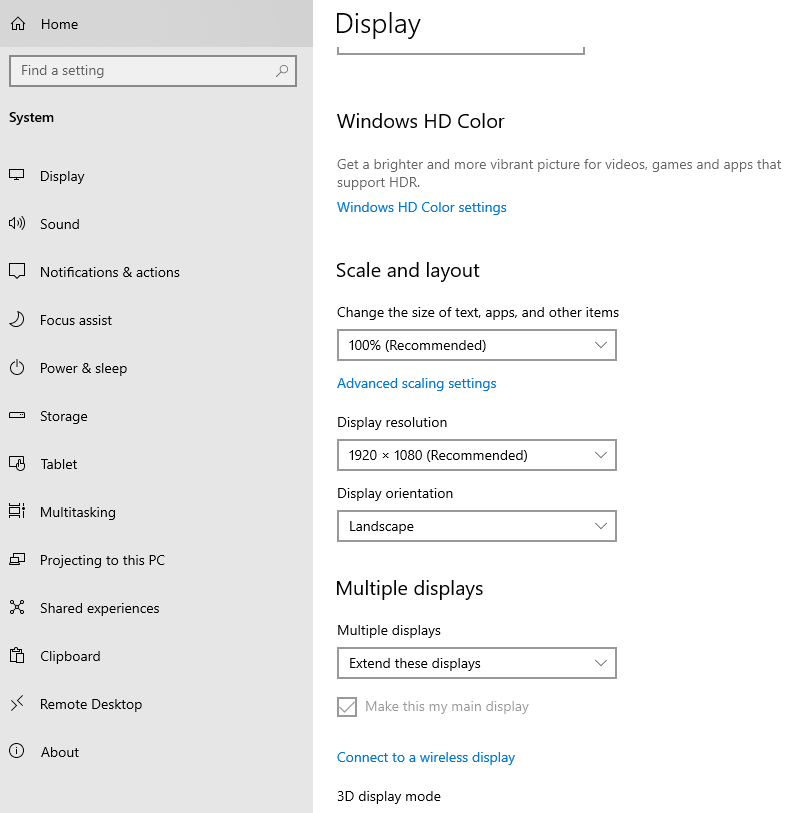
Once the display is duplicated, the image on your main screen will be copied to the projector. Since your main screen's resolution is likely going to be higher than the resolution of the projector, you may notice a change in the picture quality on your main screen so that it matches that of the projector. You can adjust the Display Resolution via the designated dropdown menu in the Display Settings. However, projecting a higher-resolution image through a lower-resolution projector may make it harder to make out fine details, like small text.